There’s nothing worse than getting a new laptop, booting it up, and then hearing that incessant coil whine noise that kicks in and out. I’ve noticed it’s worse on the HP laptops we’ve used, but HP isn’t to blame. Intel is.
In our testing, the issue seems to be related to Intel’s TurboBoost feature that allows your CPU to kick into a super boosted mode when it needs to (and in some cases increase its clock speed from 1.6GHz to 3.5!), but this can come at a cost. Coil whine.
The only way we’ve found to fix this is to disable TurboBoost. On Windows laptops you have two options:
1. Disable TurboBoost in BIOS/UEFI
One option is to head into your BIOS settings and see if there’s a way to disable TurboBoost there. We’ve seen this option on many laptops, but strangely the HP we used did not have the option in BIOS which leads us into the next option:
2. Disable TurboBoost in Windows
This option requires Administrator permissions and involves a couple of easy to do steps. The reg file you’ll merge below will enable an option in control panel to disable TurboBoost.
Firstly open up Notepad. Paste in the following text
Windows Registry Editor Version 5.00

[HKEY_LOCAL_MACHINE\SYSTEM\CurrentControlSet\Control\Power\PowerSettings\54533251-82be-4824-96c1-47b60b740d00\be337238-0d82-4146-a960-4f3749d470c7]
"Attributes"=dword:00000002
Then save the file, make sure you pick the Save type as “Any file” and end the file name in .reg – once saved, right click the file and select Merge to merge it into your registry. You will see a User Account Control prompt, click Yes on that and then you will be asked if you’re sure you want to merge, click Yes.
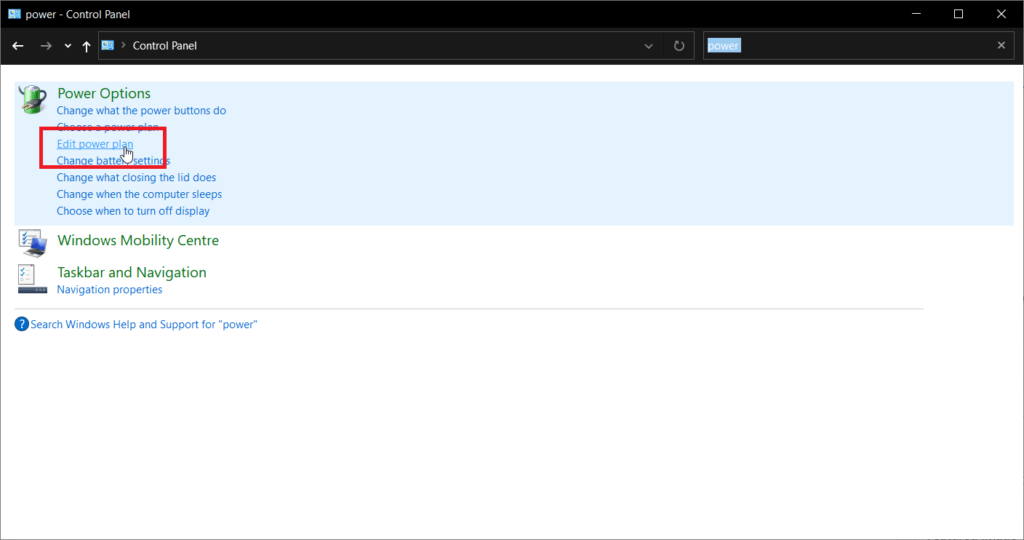
Then head to the Control Panel, search for Power and select Edit power plan
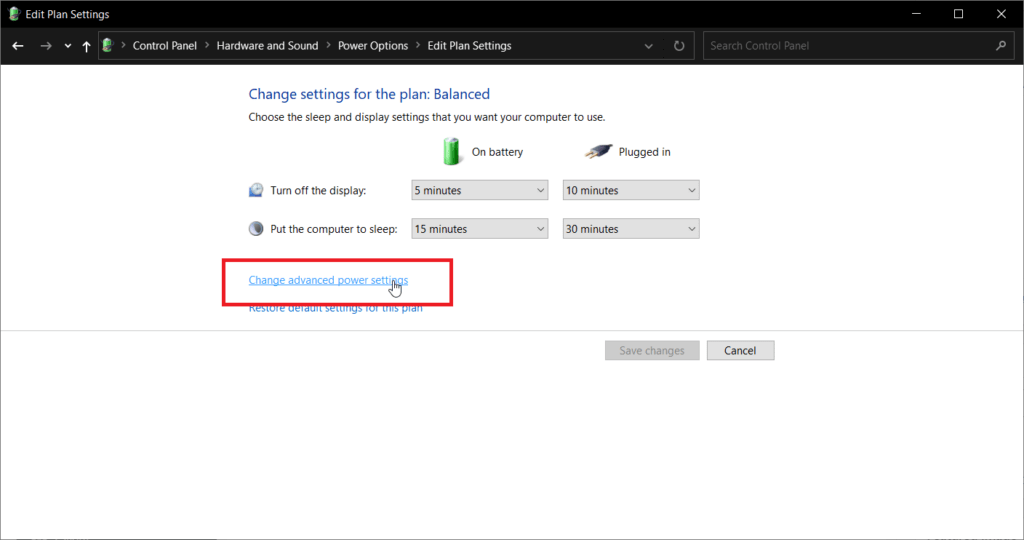
Then select Change advanced power settings
Once that’s open look under Processor power management > Processor performance mode > and Processor performance boost mode. Make sure Battery and Plugged In are set to ‘Disabled’.


